Selection Guide
Choosing the right concealed tileable access panel is crucial not only for a trouble-free installation but also for maintaining the clean and undisturbed look of the tiling. For the panel to blend perfectly with the surrounding surface while providing convenient access to the inspection area, it is necessary to consider the tile dimensions, material thickness, and the method of finishing the joints.
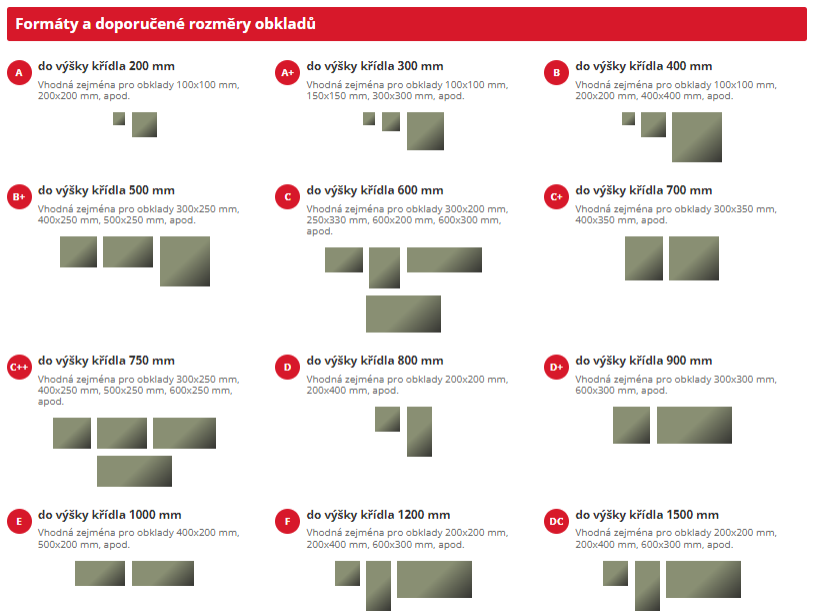
Size Guide
Rule 1
To determine the correct access panel size for your order, you must first know the tile dimensions, its thickness, and the grout color.
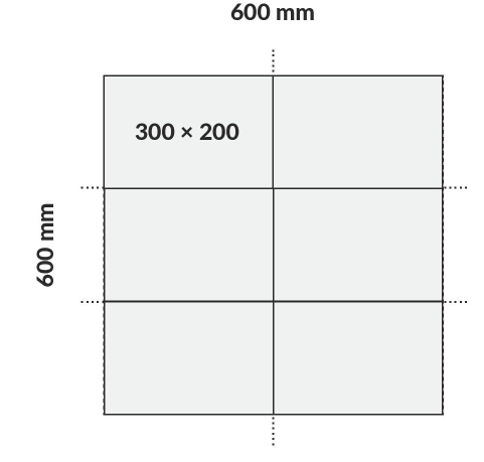
Example
For a selected tile with dimensions of 300x200 mm, you can use type C up to a leaf height of 600 mm, for example, 600x600 mm. The tile thickness is 8 mm and the grout color is Jasmine. Therefore, in the final step of the order, you will select an 8 mm trim strip in Jasmine color.
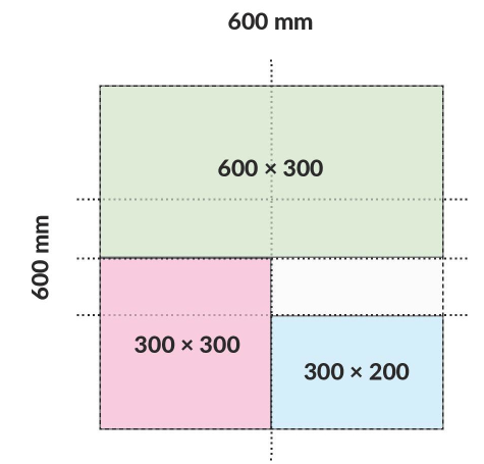
Rule 2
The access panel format is determined by the sum of the tile dimensions in width and height. The tiles can overlap the door leaf onto the frame by up to 25% on all sides except the hinge side. Here, the required overlap is 15–20 mm.
Example
For type C up to a leaf height of 600 mm, you can use tiles with dimensions of 600 × 300 mm (2 pcs), 300 × 300 mm (4 pcs), 300 × 200 mm (6 pcs).
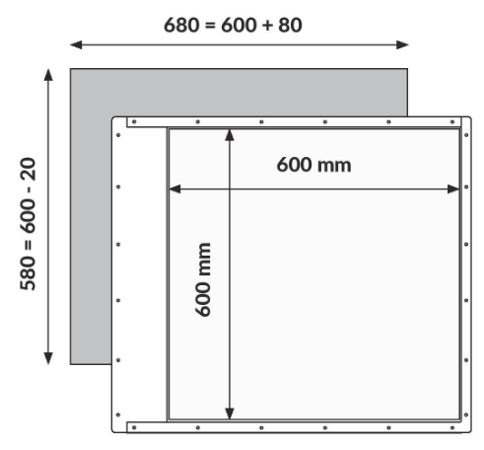
Rule 3
The mounting opening size (clearance) is calculated using a simple formula: add 80 mm to the width of the commercial panel size (name) and subtract 20 mm from the height.
Example
For the 600x600 mm size, the structural opening size is 680x580 mm (w + 80 x h - 20).
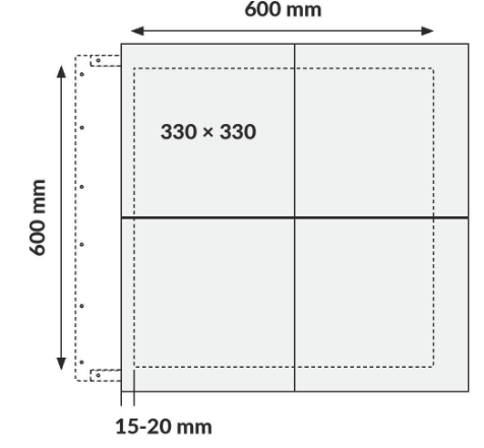
Rule 4
The maximum panel width is 800 mm, and the width must be less than or equal to the height (w ≤ h). In exceptional cases, this rule can be exceeded by 10%.
Example
With a selected tile of 330x330 mm, the ideal panel size is 600x600 mm. The tile overlap is practically arbitrary, but it is necessary to maintain a 15-20 mm overlap on the hinge side!
Types of ZAVRZ Access Panels
Standard KLIK
The access panel variant with the KLIK push-to-open system is a modern and practical solution. It uses a special double-hinge design. These panels are ideal for the construction of new residential units or renovations wherever an aesthetic and unobtrusive access to the inspection area is required.
Waterproof KLIK
An access panel variant designed for inspection shafts containing water pipes and other utilities located behind a shower cabin or in other areas exposed to direct water flow, where you need a concealed tileable panel that allows water to run down it.
Fire-Rated
Fire-rated access panels are used in buildings (new residential units, hotels, office buildings, etc.) where fire compartmentation is required. You will appreciate them especially where the panel needs to remain hidden without disrupting the aesthetic impression.
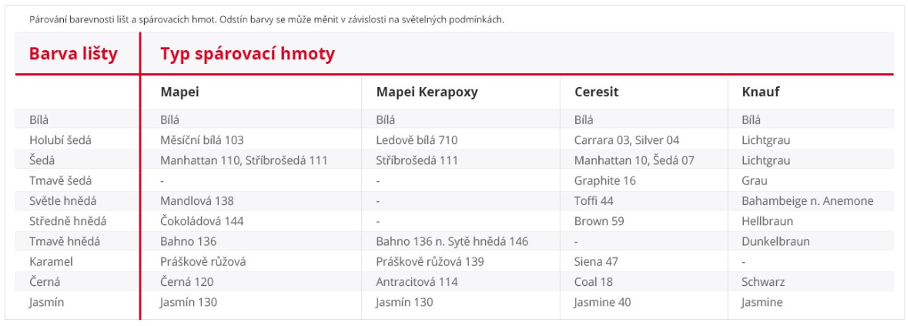
The table of trim strip and grout colors, available for each product, will help you choose the right trim strip.
Silicone Installation Instead of a Trim Strip
- Apply a greasy substance (e.g., petroleum jelly or rich cream) to the edge of the tile (the wall edge is better than the panel edge).
- Degrease the edge of the tile on the access panel.
- Close the access panel.
- Apply masking tape along both sides of the joint around the panel.
- Fill the joint with silicone.
- Press the silicone in with a rubber squeegee (this evens it out flush with the tile) so that no indentation is formed. This also ensures there is enough silicone in the joint.
- Smooth the joint with a moistened finger. Do not press hard on the silicone.
- Remove the masking tape.
- Let it dry thoroughly for at least 24 hours.
- Then open the panel and wipe off the excess greasy substance remaining on the inner edge.